For some years, Photographers have enjoyed the benefits of uploading images directly to our FTP Server, cutting out postal charges and delays. Due to the large size of RAW files, it’s been limited to those with a fast internet connection . . . until now!
We now have a method for working on a small copy of the main RAW file, meaning uploads are so much quicker! You create a copy of the RAW file that is actually a Lossy Compressed DNG file. It’s easy, just an Export option to a fresh folder. It will only work from actual RAW files – .CR2, 3NEF, not full size DNG files
Once the export has been done and the small images transferred to us, the DNG files are no longer relevant to the Workflow to and from us – we return the XMP files to match your RAW files as normal
Lightroom instructions:
- Make a selection of the images to send us, as usual (usually this means go to the folder, select all [Cmd+A or Ctrl+A] and check in the bottom left the number selected corresponds to what you expect to send to us)
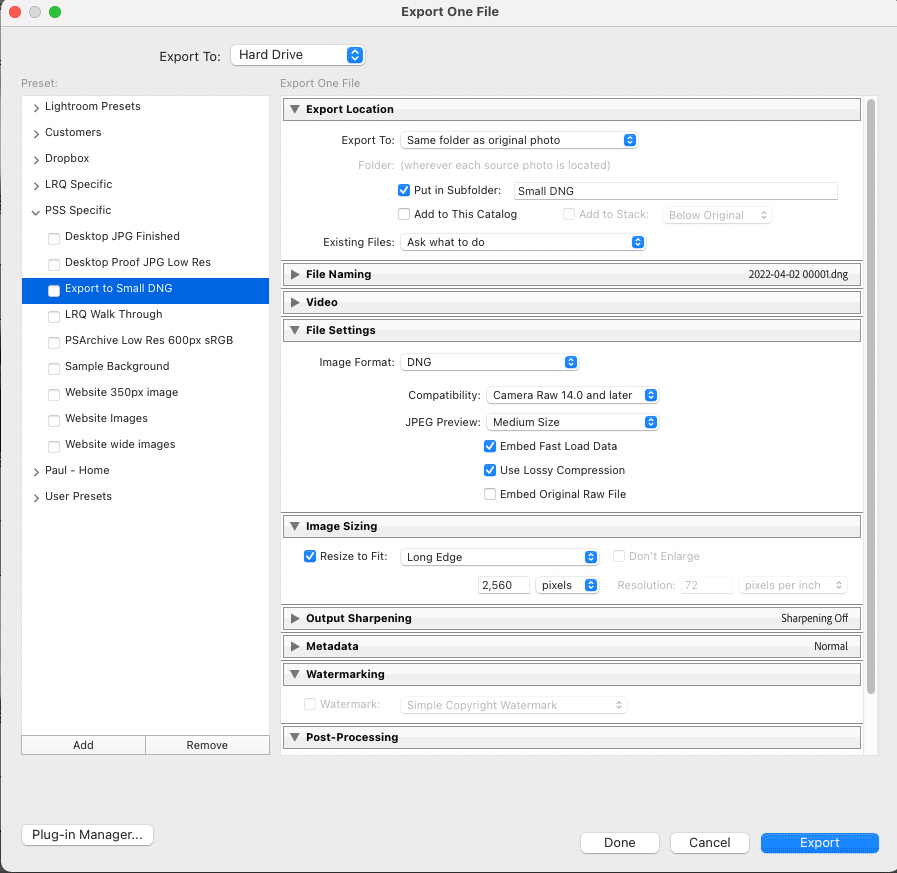
- Invoke the Export dialogue (either File menu > Export or button on the bottom left)
- Select the settings shown on the next page – we suggest using an export sub-folder that uses the name of the wedding / shoot. Ensure File Renaming is not checked
- If you select Finder / Explorer as post-processing the folder will open after export
- Press Export!
We suggest saving this as an Export Preset (bottom left in the Export dialogue, Add) and then invoke this and simply change the Subfolder name each time

Bridge / ACR instructions (to be updated):
- Make a selection of the images to send us, as usual (usually this means go to the folder, select all [Cmd+A or Ctrl+A] and check in the bottom left the number selected corresponds to what you expect to send to us)
- Invoke the ACR dialogue (in Bridge, Cmd+R [Ctrl+R] or File > Open in Camera Raw)
- Select all in ACR [Cmd+A or Ctrl+A] then Save Images (bottom left)
- Use the settings on the screenshot that follows
- Press Save!
In either case, it’s worth just opening the export directory / folder once done and check the file sizes – they should all be under around 1Mb. A common mistake is for the file size box to end up unticked and then the file size is much larger
Once happy, transfer the images from the created folder to us using FTP – please be sure to create a folder on our FTP Server and name it to include the number of images being transferred (so we can check we have them all!) and then send an email once it’s all transferred to alert us and instruct us to process them
As mentioned, these low resolution DNG files on your system then play no further part in the workflow; the XMP files we send back relate to the original RAW files you’ve already got in Lightroom / ACR
How much quicker is it? Well, it depends on your internet connection of course, but to compare the sizing we took 500 images shot on a Canon 5DMkIII and found the following:
Export 500 images as DNG files – 10 minutes (background task, will vary on system speed)
Size of the 500 DNG files – 367Mb; compares with Original size – 12.3Gb
